Home » Posts tagged 'interior painting'
Tag Archives: interior painting
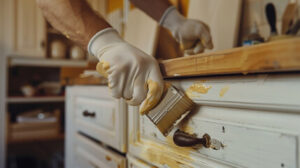
Cabinet Refinishing – Give Your Cabinets a New Look
Refinishing is a surface-level upgrade that provides minimal aesthetic benefits, especially if your cabinet doors are not made from stain grade wood. Moreover, the process is messy and introduces fumes into your home environment.
Cabinet refacing involves removing your cabinet doors and drawer fronts, chemically stripping them, repairing any damage, and painting or staining them. The result is a stunning kitchen transformation. Reach out to Cabinet Refinishing San Jose CA for expert assistance.
Cabinet refinishing allows you to give your cabinets a new look without replacing them. You can use a variety of paint finishes, including high-gloss enamels or water-based stains that are easy to clean. Before you start repainting your cabinets, clean them thoroughly to remove any grease or oil that could prevent the finish from adhering to the surface. You can use a mild cleaner such as soap and water or a more aggressive product such as trisodium phosphate (TSP). If you’re using a chemical stripper, be sure to wear a respirator mask to protect yourself.
Before you apply any finish, apply a coat of primer-sealer to all surfaces. This will help ensure a well-bonded finish and reduce the amount of sanding required. You can also choose to apply a stain sealer if you prefer a darker color. After the primer dries, you can begin painting. Begin with the top of each cabinet, then work your way down. Use a foam roller for large surfaces and a soft-bristled brush for the corners and crevices. Try to overlap each coat slightly, but be careful not to leave bare wood where it’s visible. When you’re done, allow the paint to dry in a well-ventilated area.
Staining cabinets requires more work than repainting. You’ll need to sand the existing wood surface to a smooth, even texture before applying stain. This can be time-consuming, but the end result will be a beautiful, durable finish. If you have oak or cherry wood cabinets, a deep mahogany stain might be more appropriate than a bright cherry shade. Once the stain has dried, you’ll want to wipe it down with a cloth and apply two coats of polyurethane or varnish. Be sure to sand the surface between coats for a smooth finish.
Refacing is more extensive than refinishing, but it can give your kitchen an entirely new look. The difference is that while refinishing uses only existing materials, refacing replaces the insides of your cabinet boxes with new doors and drawer fronts. You may need to install a new countertop and sink basin, too.
Staining
If you’re not in the mood to invest in painting your cabinets but want to change their color, staining is an option. The cost of staining varies depending on the type and finish you choose, and can be much less expensive than repainting cabinets. This is a great option for homeowners who love the look of natural wood but prefer a richer color than paint can offer. Before you begin the staining process, you will need to remove any hinges and handles, and mask the cabinet doors using painter’s tape. You can stain with the doors in place or remove them and set them aside.
Before starting to stain, you should thoroughly clean the raw wood surfaces using a damp cloth and mild detergent. This will help remove any dirt and grease that may be clinging to the surface, especially since kitchens can be very greasy areas. After washing the surfaces, you will need to dry them completely with a clean cloth. Thoroughly cleaning the surfaces can also help prevent smudges or streaking once the new stain is applied.
Once the cabinet surfaces are cleaned, you will need to sand them to prepare the surface for the new stain. You can do this by hand or with an electric sander, and should start with a coarse grit sandpaper (80-100 grit) before gradually working up to a finer grit (120-150 grit). After sanding the surfaces, you will need to wipe them down with mineral spirits to remove any remaining grit. Once the wood is smooth and sanded, you can apply a wood conditioner to help ensure even stain absorption.
Depending on the type of stain you use, you will need to apply multiple coats of stain until you achieve the desired color. Between each coat, you will need to lightly scuff the cabinet surfaces with steel wool to ensure that they absorb the stain evenly. You will also need to allow the first coat of stain to fully dry before applying a second coat.
Once you have finished the staining process, it is a good idea to seal the cabinets to protect them from wear and tear. You can use a polyurethane sealer or a similar product, and should follow the manufacturer’s instructions for application and drying times. Some products even combine stain and sealer for a one-step finishing process.
Veneering
Veneer is wood that is cut very thin and bonded to another material, typically particle board. The process creates a surface that is more stable than solid wood, making it less prone to cracking and warping over time. The result is a more durable surface that can be used for a variety of purposes. It is often used in place of solid wood when a decorative or unique look is desired. It is also a more economical option for those looking to change the style of their cabinets without incurring the expense of major construction or re-design.
There are several different types of veneering techniques. A veneer can be spliced and glued to produce faces that are four feet wide or more. The leaves of the veneer are knife cut lengthwise then spliced to make faces in widths that are consistent with their dimensionality. These faces are then backed with materials such as paper, wood crossbanding, poly/resin back or phenolic.
Faced veneers are used when a design or style requires the use of highly figured or unusual grain patterns, for stability or simply to add a more elegant touch to an interior. Veneered panels do not have the same movement problems as solid wood panels but they can be affected by a change in humidity, temperature or exposure to sunlight.
It is important to keep in mind that a veneer will show a lot of variation from one piece to the next, especially on blonde pieces. To prevent an overwhelming amount of variation in the finished product it is important to carefully plan your project. One way to do this is to use a sequence matched veneer, which utilizes leaves that are all cut in the same order. This allows the figuring of the veneer to be repeated throughout the project.
Other methods of matching veneer flitches are random match or slip match. In a random match the figured pattern is assembles without regard to the direction of the grain. In a slip match consecutive veneer leaves are slid across each other side by side, like slipping cards in a deck of playing cards. This technique is commonly used with quarter and rift cut veneers that contain heart and sap wood to avoid the appearance of a flitch joint.
Refinishing
Refinishing is a more involved project than painting or staining cabinets. It takes time, and it’s not an easy task for homeowners to take on themselves. Refinishing involves sanding down the existing cabinets and revitalizing them with a new finish, such as lacquer. This type of work is best left to professionals, as it can require several days to complete and requires the use of solvent-borne lacquer, which produces volatile fumes that will linger in your home for a day or more.
Cabinet refacing is more extensive than refinishing, but it can provide a dramatic aesthetic change in your kitchen. It is also a more eco-conscious alternative, as it uses the existing cabinet boxes and framing materials instead of buying and installing brand new ones. In addition, refacing doesn’t involve the disposal of hazardous chemicals in landfills, which can leach into groundwater and soil.
A popular choice for a kitchen update is to reface your cabinets with new doors and drawer fronts. This can be done using your own material, or you can hire a professional to install them for you. Refacing is also a more cost-effective option than replacing your cabinets completely.
Before starting the refacing process, you’ll want to remove your cabinet doors and hardware. Be sure to label them so that you can put them back in the correct place once the job is complete. It’s also important to cover any surfaces that you don’t want to get paint or stain on, such as countertops and floors. Use plastic sheeting and drop cloths to protect them.
Once your cabinets are sanded, you’ll need to use wood filler to repair any scratches, dents, and gouges in the wood. Once the filler has dried, sand again to smooth out the surface. Be sure to wear a dust mask, as sanding can produce large amounts of dust that can irritate your lungs and eyes.
It’s also important to use a high-quality primer before applying your finish. This will help to promote better adhesion and even results. Be sure to follow the manufacturer’s application instructions. It’s also a good idea to apply the primer in a well-ventilated area, as stain and paint can give off strong odors that may be difficult to breathe.